> ## Documentation Index
> Fetch the complete documentation index at: https://cometchat-013b37f0.mintlify.site/llms.txt
> Use this file to discover all available pages before exploring further.
# Android
The Push Notification extension allows you to send push notifications to mobile apps and desktop browsers. In this section, we will see how to send Push Notifications to your Android app using Firebase Cloud Messaging or FCM.
Use Connection Service
If you want to use the System's native call service to handle calls, please refer to our guide on [Android - Connection Service](/notifications/android-connection-service)
Android Push notifications sample app
View on Github
## Firebase Project Setup
Visit [Firebase Console](https://console.firebase.google.com) and login/signup using your Gmail ID.
### Step 1: Create a new Firebase Project
On your Firebase Console, create a new project.
 This is a simple 3 step process where:
1. You give a name to your project
2. Add Google Analytics to your project (Optional)
3. Configure Google Analytics account (Optional)
Click on Create and you are ready to go.
### Step 2: Add Firebase to your Android App
1. Click on the Android icon as shown on the screen below.
This is a simple 3 step process where:
1. You give a name to your project
2. Add Google Analytics to your project (Optional)
3. Configure Google Analytics account (Optional)
Click on Create and you are ready to go.
### Step 2: Add Firebase to your Android App
1. Click on the Android icon as shown on the screen below.
 2. Register your Android app by providing the following details:
1. Android Package name
2. App nickname (optional)
3. Debug signing certificate SHA-1 (optional)
2. Register your Android app by providing the following details:
1. Android Package name
2. App nickname (optional)
3. Debug signing certificate SHA-1 (optional)
 3. Download the `google-services.json` file and place it in the required location in your project.
 4. Add Firebase SDK by copying and pasting the snippets in the Project-level `build.gradle` file.
 5. Add Firebase SDK by copying and pasting the snippets in the App-level `build.gradle` file.
 6. Click on 'Continue to Console' to finish the setup.
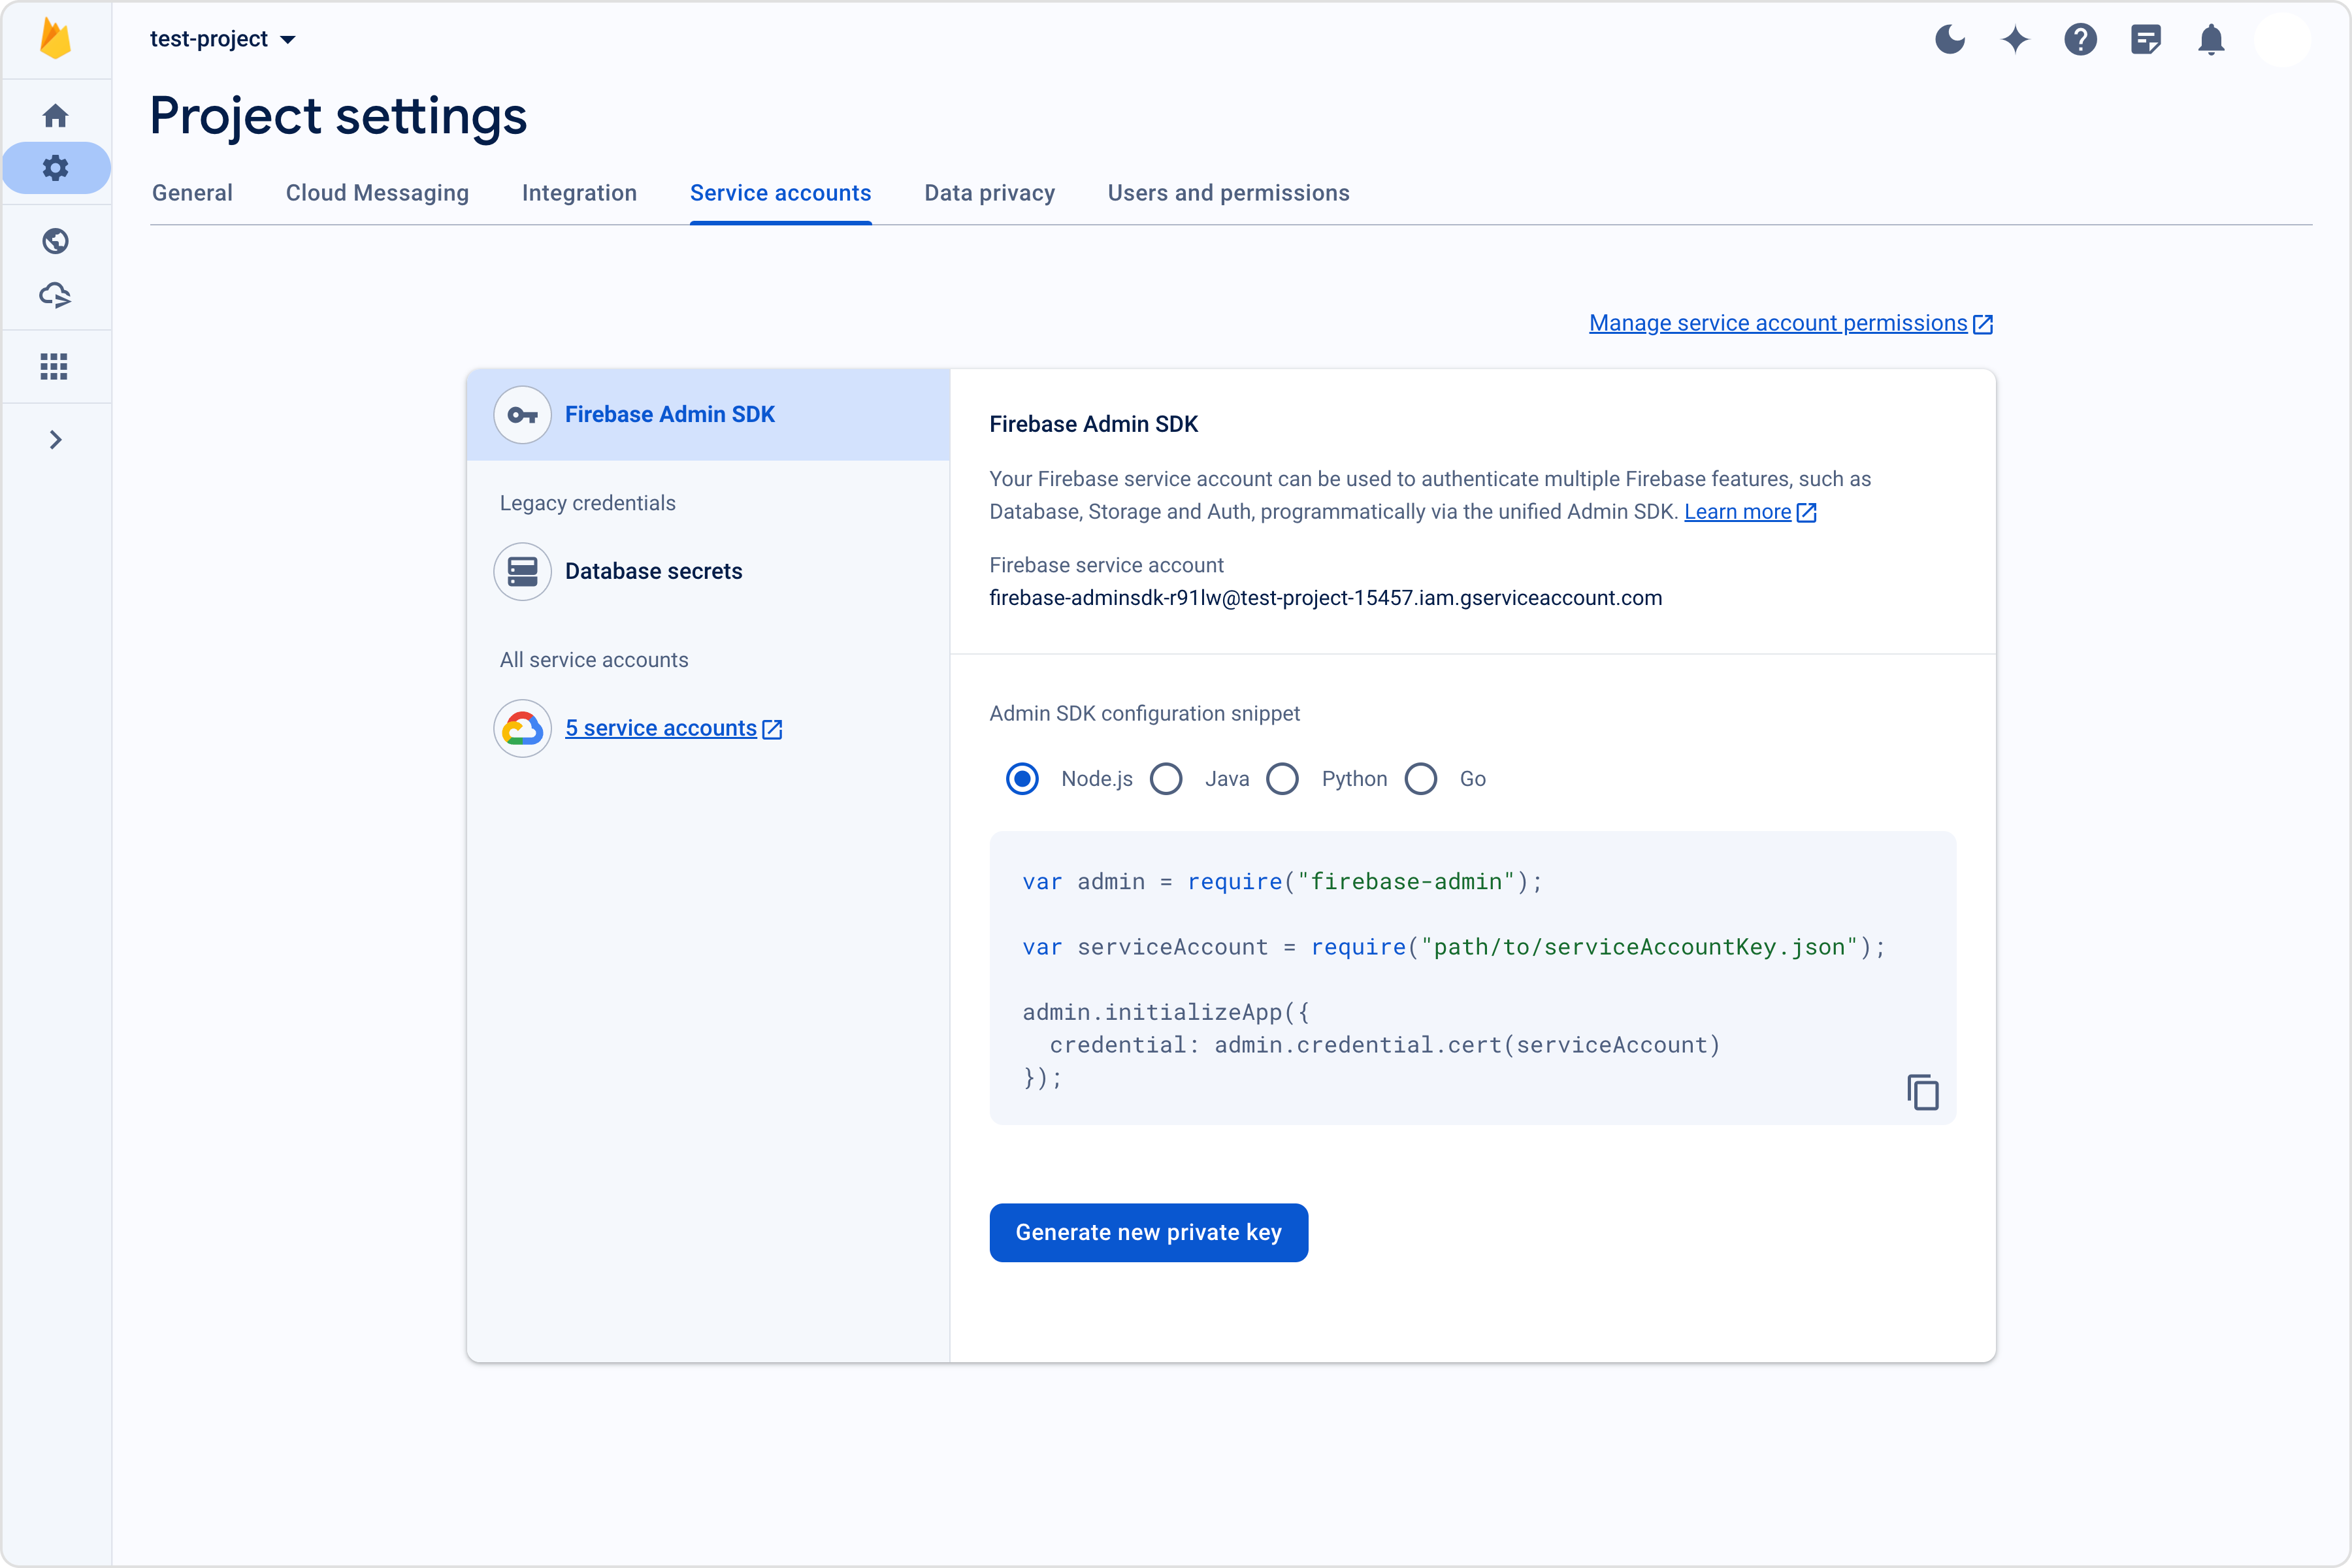
### Step 3: Download the service account file
6. Click on 'Continue to Console' to finish the setup.
### Step 3: Download the service account file
 ## Extension settings
### Step 1: Enable the extension
1. Login to [CometChat](https://app.cometchat.com/login) and select your app.
2. Go to the Extensions section and Enable the Push Notifications extension.
3. Open the settings for this extension and save the following.
## Extension settings
### Step 1: Enable the extension
1. Login to [CometChat](https://app.cometchat.com/login) and select your app.
2. Go to the Extensions section and Enable the Push Notifications extension.
3. Open the settings for this extension and save the following.
 ### Step 2: Save your settings
On the Settings page you need to enter the following:
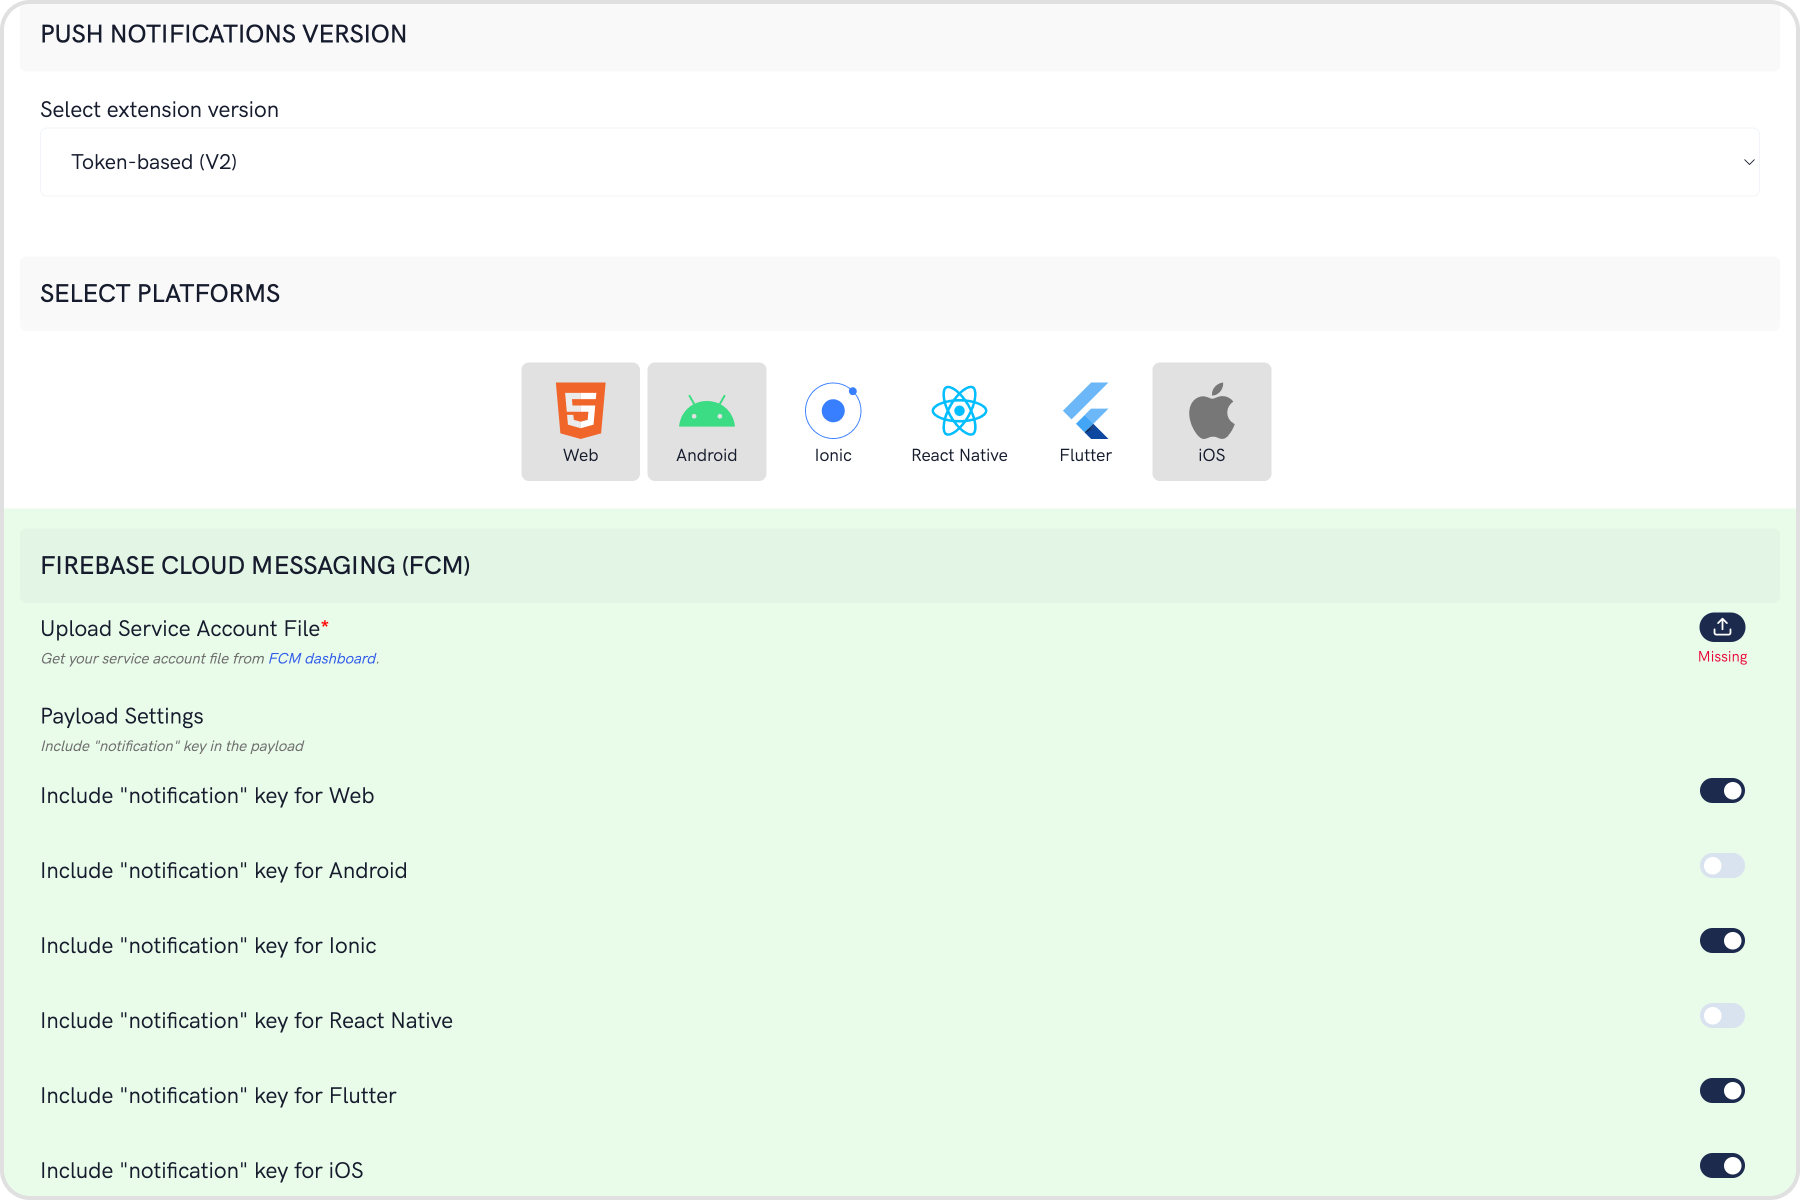
1. **Set extension version**
* If you are setting it for the first time, Select `V2` to start using the token-based version of the Push Notification extension.
* If you already have an app using `V1` and want to migrate your app to use `V2`, then Select `V1 & V2` option. This ensures that the users viewing the older version of your app also receive Push Notifications.
* Eventually, when all your users are on the latest version of your app, you can change this option to `V2`, thus turning off `V1` (Topic-based) Push Notifications completely.
2. **Select the platforms that you want to support**
* Select from Web, Android, Ionic, React Native, Flutter & iOS.
3. **Notification payload settings**
* You can control if the notification key should be in the Payload or not. Learn more about the FCM Messages [here](https://firebase.google.com/docs/cloud-messaging/concept-options).
4. **Push payload message options**
### Step 2: Save your settings
On the Settings page you need to enter the following:
1. **Set extension version**
* If you are setting it for the first time, Select `V2` to start using the token-based version of the Push Notification extension.
* If you already have an app using `V1` and want to migrate your app to use `V2`, then Select `V1 & V2` option. This ensures that the users viewing the older version of your app also receive Push Notifications.
* Eventually, when all your users are on the latest version of your app, you can change this option to `V2`, thus turning off `V1` (Topic-based) Push Notifications completely.
2. **Select the platforms that you want to support**
* Select from Web, Android, Ionic, React Native, Flutter & iOS.
3. **Notification payload settings**
* You can control if the notification key should be in the Payload or not. Learn more about the FCM Messages [here](https://firebase.google.com/docs/cloud-messaging/concept-options).
4. **Push payload message options**
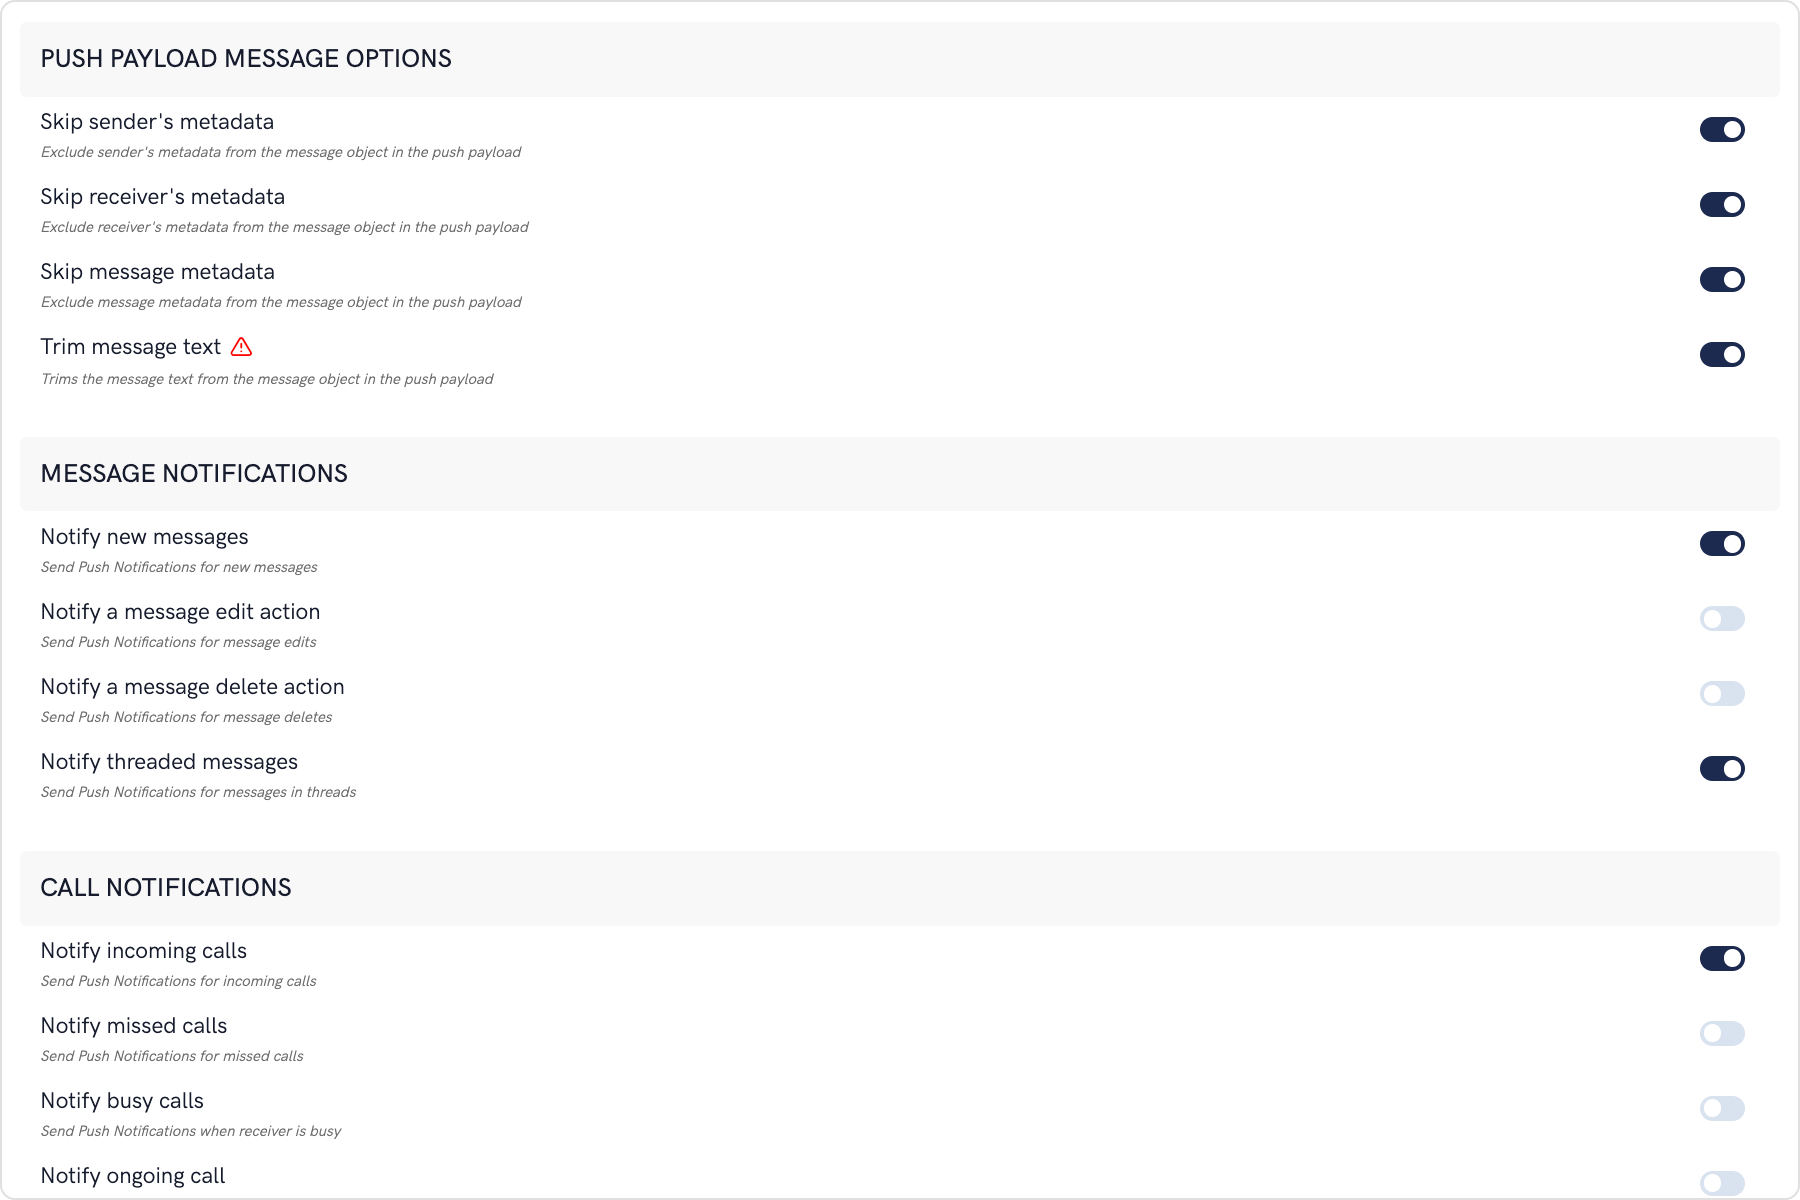 The maximum payload size supported by FCM and APNs for push notifications is approximately 4 KB. Due to the inclusion of CometChat's message object, the payload size may exceed this limit, potentially leading to non-delivery of push notifications for certain messages. The options provided allow you to remove the sender's metadata, receiver's metadata, message metadata and trim the content of the text field.
* The message metadata includes the outputs of the Thumbnail Generation, Image Moderation, and Smart Replies extensions. You may want to retain this metadata if you need to customize the notification displayed to the end user based on these outputs.
5. **Notification Triggers**
The maximum payload size supported by FCM and APNs for push notifications is approximately 4 KB. Due to the inclusion of CometChat's message object, the payload size may exceed this limit, potentially leading to non-delivery of push notifications for certain messages. The options provided allow you to remove the sender's metadata, receiver's metadata, message metadata and trim the content of the text field.
* The message metadata includes the outputs of the Thumbnail Generation, Image Moderation, and Smart Replies extensions. You may want to retain this metadata if you need to customize the notification displayed to the end user based on these outputs.
5. **Notification Triggers**
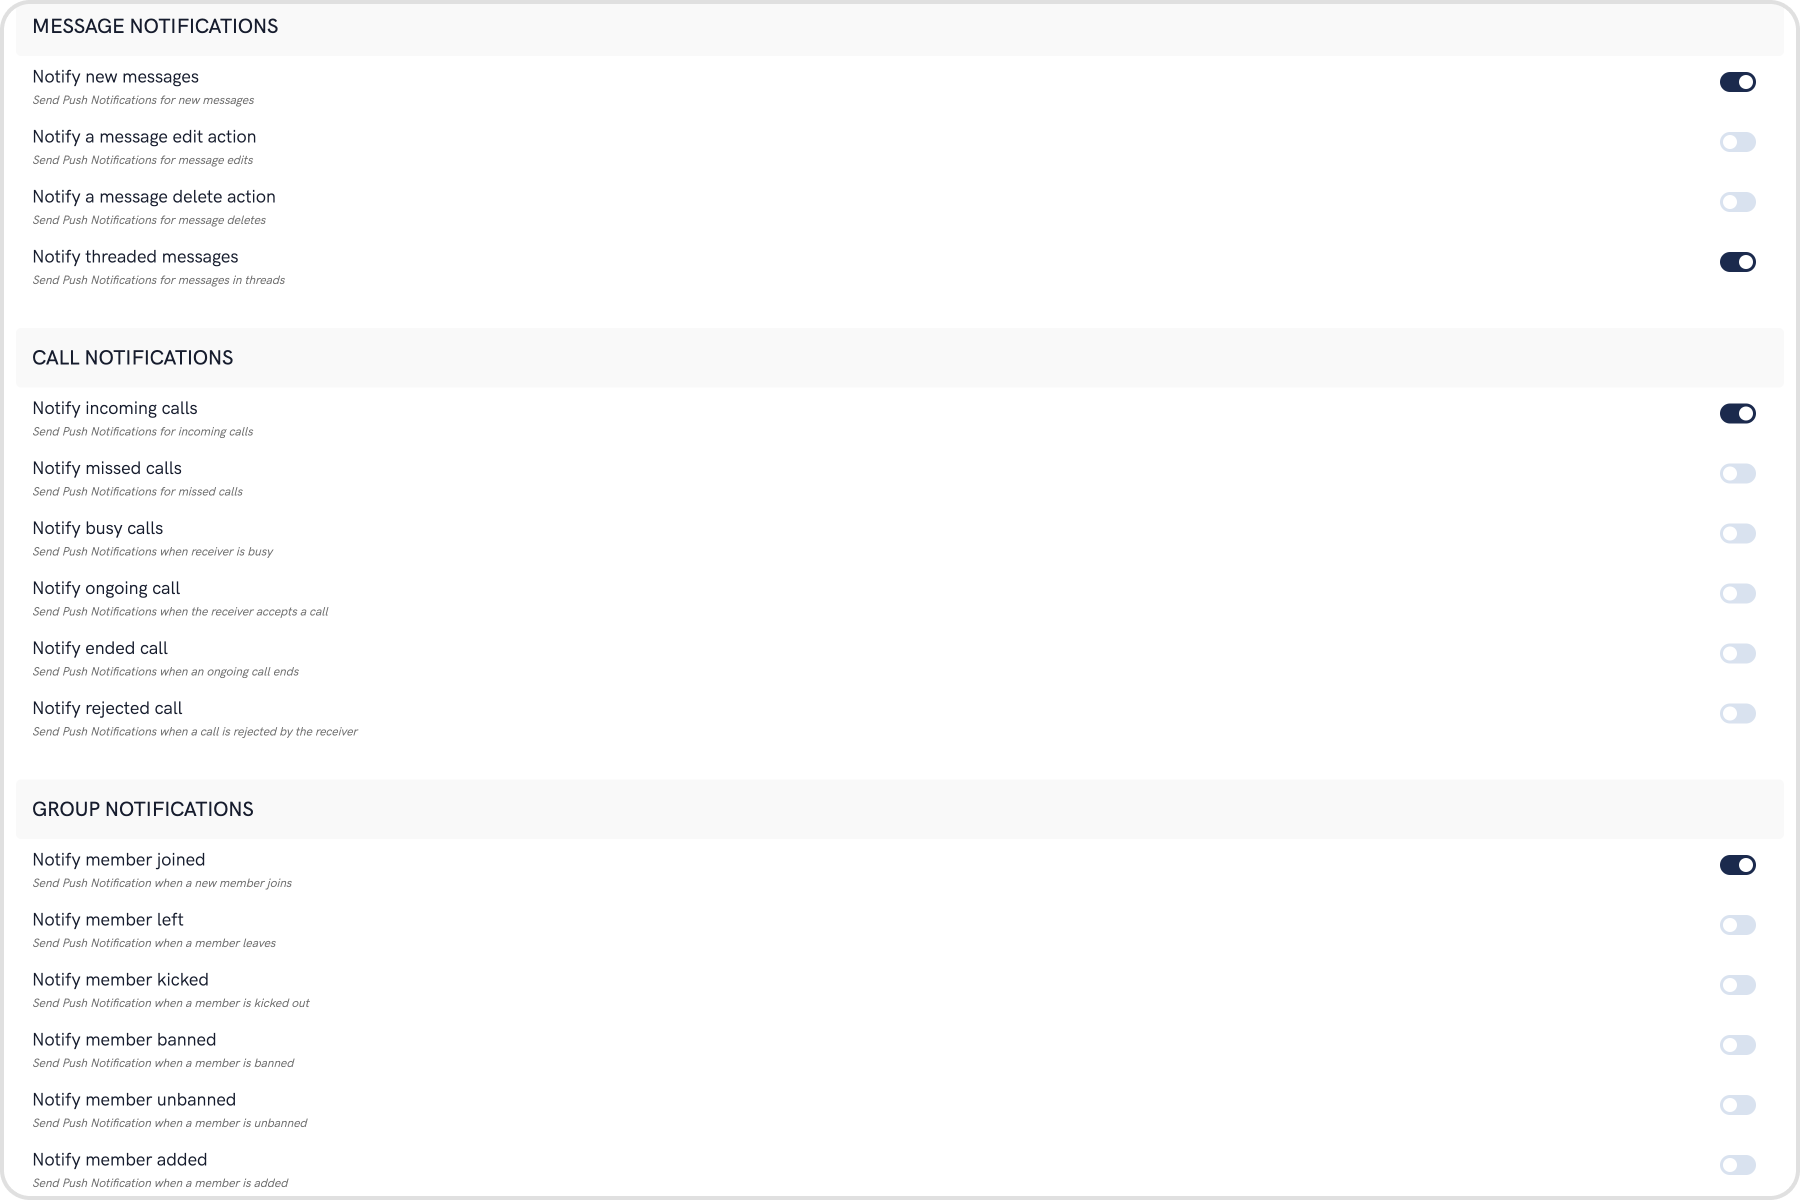 * Select the triggers for sending Push Notifications. These triggers can be classified into 3 main categories:
1. Message Notifications
2. Call Notifications
3. Group Notifications
* These are pretty self-explanatory and you can toggle them as per your requirement.
## Android App Setup
In the Firebase Project setup, we did the following things:
1. Added google-services.json file to the project.
2. Added the required Firebase SDK snippets to the Project-level build.grade file.
3. Added the required Firebase SDK snippets to the App-level build.gradle file.
If you want more details, check the [Firebase Documentation](https://firebase.google.com/docs/cloud-messaging/android/client).
### Step 1: Register the FCM Token on user login
1. Initialize CometChat and then login your user.
2. On successful login, you can register the obtained FCM Token using `CometChat.registerTokenForPushNotification()` function call. (You can see the process of getting the FCM Token in the next step)
```java theme={null}
CometChat.registerTokenForPushNotification(MyFirebaseMessagingService.token, new CometChat.CallbackListener() {
@Override
public void onSuccess(String s) {
Log.e( "onSuccessPN: ",s );
}
@Override
public void onError(CometChatException e) {
Log.e("onErrorPN: ",e.getMessage() );
}
});
```
```kotlin theme={null}
CometChat.registerTokenForPushNotification(MyFirebaseMessagingService.token, object : CallbackListener() {
override fun onSuccess(s: String?) {
Log.e("onSuccessPN: ", s)
}
override fun onError(e: CometChatException) {
Log.e("onErrorPN: ", e.message)
}
})
```
To fetch the registered token you can use below Firebase method.
```java theme={null}
FirebaseInstanceId.getInstance().getInstanceId().addOnCompleteListener(
new OnCompleteListener() {
@Override
public void onComplete(@NonNull Task task) {
if (!task.isSuccessful()) {
return;
}
token = task.getResult().getToken();
//CometChat.registerTokenForPushNotification(token, CometChat.CallbackListener());
}
});
```
```kotlin theme={null}
FirebaseInstanceId.getInstance().getInstanceId()
.addOnCompleteListener(object : OnCompleteListener() {
fun onComplete(task: com.google.android.gms.tasks.Task) {
if (!task.isSuccessful()) {
return
}
token = task.getResult().getToken()
//CometChat.registerTokenForPushNotification(token,CometChat.CallbackListener())
}
})
```
### Step 2: Receive notifications
1. The FCM Token can be received by overriding the `onNewToken()` method. This token is stored as a String variable. You can choose to store it in SharedPreferences as well.
2. To receive messages, you need to override the onMessageReceived(RemoteMessage remoteMessage).
3. [PushNotificationService.java](https://github.com/cometchat/cometchat-push-notification-app-android/blob/v4-push-notifications-extension/app/src/main/java/com/cometchat/pushnotificationsample/PushNotificationService.java) has the code that provides a way you can handle messages received from CometChat users and groups.
4. CallNotificationAction.class is a BroadcastReceiver which is used to handle call events when your app is in the background state.
5. Since Android O, there have been certain restrictions added for background tasks and users cannot launch intent directly from the service. More details [here](https://developer.android.com/guide/components/activities/background-starts).
6. We suggest you to create notification channel inside your application class. After Android O, it is necessary to register notification channel to allow notifications of your apps.
```java theme={null}
private void createNotificationChannel() {
// Create the NotificationChannel, but only on API 26+ because
// the NotificationChannel class is new and not in the support library
if (Build.VERSION.SDK_INT >= Build.VERSION_CODES.O) {
CharSequence name = getString(R.string.app_name);
String description = getString(R.string.channel_description);
int importance = NotificationManager.IMPORTANCE_HIGH;
NotificationChannel channel = new NotificationChannel("2", name, importance);
channel.setDescription(description);
channel.enableVibration(true);
channel.setLockscreenVisibility(Notification.VISIBILITY_PUBLIC);
// Register the channel with the system; you can't change the importance
// or other notification behaviors after this
NotificationManager notificationManager = getSystemService(NotificationManager.class);
notificationManager.createNotificationChannel(channel);
}
}
```
* You also need to add both of the above-mentioned files in your AndroidManifest.xml to make Push notification work in the background as well.
```xml theme={null}
```
## Advanced
### Sending Custom Notification body
Push notification has 2 parts, namely, the notification title and notification body. The title can be: a. Name of the sender in case of one-on-one message. (E.g.: Nancy Grace) b. Name of the sender followed by group name for group messages (E.g.: Nancy Grace @ Hiking Group)
The body of the message depends upon the type of message being sent. You can send a custom body by specifying the `pushNotification` key followed by some user-defined string for the notification body inside `metadata` while sending the message.
The following code shows an example of a Custom body using a message of category=custom. This is however not just limited to a custom category of messages.
```java theme={null}
String receiverId="cometchat-uid-1";
JSONObject metaData=new JSONObject();
JSONObject customData=new JSONObject();
try {
metaData.put("pushNotification","Custom Notification body");
customData.put("yourkey","Your Value");
} catch (JSONException e) {
e.printStackTrace();
}
CustomMessage customMessage=new CustomMessage(receiverId,CometChatConstants.RECEIVER_TYPE_USER,customData);
customMessage.setMetadata(metaData);
CometChat.sendCustomMessage(customMessage, new CometChat.CallbackListener() {
@Override
public void onSuccess(CustomMessage customMessage) {
Log.d(TAG, "onSuccess: "+customMessage.toString());
}
@Override
public void onError(CometChatException e) {
Log.d(TAG, "onError: "+e.getMessage());
}
});
```
```kotlin theme={null}
var receiverId:String="cometchat-uid-1"
var metaData:JSONObject=JSONObject()
var customData:JSONObject= JSONObject()
try {
metaData.put("pushNotification","Custom Notification Body")
customData.put("yourkey","Your Value")
} catch (e:JSONException) {
e.printStackTrace()
}
var customMessage = CustomMessage(receiverId,CometChatConstants.RECEIVER_TYPE_USER,customData)
customMessage.metadata = metaData;
CometChat.sendCustomMessage(customMessage, object :CometChat.CallbackListener() {
override fun onSuccess(p0: CustomMessage?) {
Log.d(TAG,"onSuccess ${p0?.toString()}")
}
override fun onError(p0: CometChatException?) {
Log.d(TAG,"onError ${p0?.message}")
}
})
```
### Converting Push Notification Payloads to Message Objects
CometChat provides a method `CometChatHelper.processMessage()` to convert the message JSON to the corresponding object of `TextMessage`, `MediaMessage`, `CustomMessage`, `Action` or `Call`.
This code needs to be added to the `onMessageReceived()` method of the `FirebaseMessagingService` class.
```java theme={null}
CometChatHelper.processMessage(new JSONObject(remoteMessage.getData().get("message"));
```
Type of Attachment can be of the following the type\
`CometChatConstants.MESSAGE_TYPE_IMAGE`\
`CometChatConstants.MESSAGE_TYPE_VIDEO`\
`CometChatConstants.MESSAGE_TYPE_AUDIO`\
`CometChatConstants.MESSAGE_TYPE_FILE`
Push Notification Payload sample for text and media messages-
```json theme={null}
{
"alert": "Nancy Grace: Text Message",
"sound": "default",
"title": "CometChat",
"message": {
"receiver": "cometchat-uid-4",
"data": {
"entities": {
"receiver": {
"entityType": "user",
"entity": {
"uid": "cometchat-uid-4",
"role": "default",
"name": "Susan Marie",
"avatar": "https://assets.cometchat.io/sampleapp/v2/users/cometchat-uid-4.webp",
"status": "offline"
}
},
"sender": {
"entityType": "user",
"entity": {
"uid": "cometchat-uid-3",
"role": "default",
"name": "Nancy Grace",
"avatar": "https://assets.cometchat.io/sampleapp/v2/users/cometchat-uid-3.webp",
"status": "offline"
}
}
},
"text": "Text Message"
},
"sender": "cometchat-uid-3",
"receiverType": "user",
"id": "142",
"sentAt": 1555668711,
"category": "message",
"type": "text"
}
}
```
```json theme={null}
{
"alert": "Nancy Grace: has sent an image",
"sound": "default",
"title": "CometChat",
"message": {
"receiver": "cometchat-uid-4",
"data": {
"attachments": [
{
"extension": "png",
"size": 14327,
"name": "extension_leftpanel.png",
"mimeType": "image_png",
"url": "https://s3-eu-west-1.amazonaws.com/data.cometchat.com/1255466c41bd7f/media/1555671238_956450103_extension_leftpanel.png"
}
],
"entities": {
"receiver": {
"entityType": "user",
"entity": {
"uid": "cometchat-uid-4",
"role": "default",
"name": "Susan Marie",
"avatar": "https://assets.cometchat.io/sampleapp/v2/users/cometchat-uid-4.webp",
"status": "offline"
}
},
"sender": {
"entityType": "user",
"entity": {
"uid": "cometchat-uid-3",
"role": "default",
"name": "Nancy Grace",
"avatar": "https://assets.cometchat.io/sampleapp/v2/users/cometchat-uid-3.webp",
"status": "offline"
}
}
},
"url": "https://s3-eu-west-1.amazonaws.com/data.cometchat.com/1255466c41bd7f/media/1555671238_956450103_extension_leftpanel.png"
},
"sender": "cometchat-uid-3",
"receiverType": "user",
"id": "145",
"sentAt": 1555671238,
"category": "message",
"type": "image"
}
}
```
### Handle Push Notification Actions.
* Select the triggers for sending Push Notifications. These triggers can be classified into 3 main categories:
1. Message Notifications
2. Call Notifications
3. Group Notifications
* These are pretty self-explanatory and you can toggle them as per your requirement.
## Android App Setup
In the Firebase Project setup, we did the following things:
1. Added google-services.json file to the project.
2. Added the required Firebase SDK snippets to the Project-level build.grade file.
3. Added the required Firebase SDK snippets to the App-level build.gradle file.
If you want more details, check the [Firebase Documentation](https://firebase.google.com/docs/cloud-messaging/android/client).
### Step 1: Register the FCM Token on user login
1. Initialize CometChat and then login your user.
2. On successful login, you can register the obtained FCM Token using `CometChat.registerTokenForPushNotification()` function call. (You can see the process of getting the FCM Token in the next step)
```java theme={null}
CometChat.registerTokenForPushNotification(MyFirebaseMessagingService.token, new CometChat.CallbackListener() {
@Override
public void onSuccess(String s) {
Log.e( "onSuccessPN: ",s );
}
@Override
public void onError(CometChatException e) {
Log.e("onErrorPN: ",e.getMessage() );
}
});
```
```kotlin theme={null}
CometChat.registerTokenForPushNotification(MyFirebaseMessagingService.token, object : CallbackListener() {
override fun onSuccess(s: String?) {
Log.e("onSuccessPN: ", s)
}
override fun onError(e: CometChatException) {
Log.e("onErrorPN: ", e.message)
}
})
```
To fetch the registered token you can use below Firebase method.
```java theme={null}
FirebaseInstanceId.getInstance().getInstanceId().addOnCompleteListener(
new OnCompleteListener() {
@Override
public void onComplete(@NonNull Task task) {
if (!task.isSuccessful()) {
return;
}
token = task.getResult().getToken();
//CometChat.registerTokenForPushNotification(token, CometChat.CallbackListener());
}
});
```
```kotlin theme={null}
FirebaseInstanceId.getInstance().getInstanceId()
.addOnCompleteListener(object : OnCompleteListener() {
fun onComplete(task: com.google.android.gms.tasks.Task) {
if (!task.isSuccessful()) {
return
}
token = task.getResult().getToken()
//CometChat.registerTokenForPushNotification(token,CometChat.CallbackListener())
}
})
```
### Step 2: Receive notifications
1. The FCM Token can be received by overriding the `onNewToken()` method. This token is stored as a String variable. You can choose to store it in SharedPreferences as well.
2. To receive messages, you need to override the onMessageReceived(RemoteMessage remoteMessage).
3. [PushNotificationService.java](https://github.com/cometchat/cometchat-push-notification-app-android/blob/v4-push-notifications-extension/app/src/main/java/com/cometchat/pushnotificationsample/PushNotificationService.java) has the code that provides a way you can handle messages received from CometChat users and groups.
4. CallNotificationAction.class is a BroadcastReceiver which is used to handle call events when your app is in the background state.
5. Since Android O, there have been certain restrictions added for background tasks and users cannot launch intent directly from the service. More details [here](https://developer.android.com/guide/components/activities/background-starts).
6. We suggest you to create notification channel inside your application class. After Android O, it is necessary to register notification channel to allow notifications of your apps.
```java theme={null}
private void createNotificationChannel() {
// Create the NotificationChannel, but only on API 26+ because
// the NotificationChannel class is new and not in the support library
if (Build.VERSION.SDK_INT >= Build.VERSION_CODES.O) {
CharSequence name = getString(R.string.app_name);
String description = getString(R.string.channel_description);
int importance = NotificationManager.IMPORTANCE_HIGH;
NotificationChannel channel = new NotificationChannel("2", name, importance);
channel.setDescription(description);
channel.enableVibration(true);
channel.setLockscreenVisibility(Notification.VISIBILITY_PUBLIC);
// Register the channel with the system; you can't change the importance
// or other notification behaviors after this
NotificationManager notificationManager = getSystemService(NotificationManager.class);
notificationManager.createNotificationChannel(channel);
}
}
```
* You also need to add both of the above-mentioned files in your AndroidManifest.xml to make Push notification work in the background as well.
```xml theme={null}
```
## Advanced
### Sending Custom Notification body
Push notification has 2 parts, namely, the notification title and notification body. The title can be: a. Name of the sender in case of one-on-one message. (E.g.: Nancy Grace) b. Name of the sender followed by group name for group messages (E.g.: Nancy Grace @ Hiking Group)
The body of the message depends upon the type of message being sent. You can send a custom body by specifying the `pushNotification` key followed by some user-defined string for the notification body inside `metadata` while sending the message.
The following code shows an example of a Custom body using a message of category=custom. This is however not just limited to a custom category of messages.
```java theme={null}
String receiverId="cometchat-uid-1";
JSONObject metaData=new JSONObject();
JSONObject customData=new JSONObject();
try {
metaData.put("pushNotification","Custom Notification body");
customData.put("yourkey","Your Value");
} catch (JSONException e) {
e.printStackTrace();
}
CustomMessage customMessage=new CustomMessage(receiverId,CometChatConstants.RECEIVER_TYPE_USER,customData);
customMessage.setMetadata(metaData);
CometChat.sendCustomMessage(customMessage, new CometChat.CallbackListener() {
@Override
public void onSuccess(CustomMessage customMessage) {
Log.d(TAG, "onSuccess: "+customMessage.toString());
}
@Override
public void onError(CometChatException e) {
Log.d(TAG, "onError: "+e.getMessage());
}
});
```
```kotlin theme={null}
var receiverId:String="cometchat-uid-1"
var metaData:JSONObject=JSONObject()
var customData:JSONObject= JSONObject()
try {
metaData.put("pushNotification","Custom Notification Body")
customData.put("yourkey","Your Value")
} catch (e:JSONException) {
e.printStackTrace()
}
var customMessage = CustomMessage(receiverId,CometChatConstants.RECEIVER_TYPE_USER,customData)
customMessage.metadata = metaData;
CometChat.sendCustomMessage(customMessage, object :CometChat.CallbackListener() {
override fun onSuccess(p0: CustomMessage?) {
Log.d(TAG,"onSuccess ${p0?.toString()}")
}
override fun onError(p0: CometChatException?) {
Log.d(TAG,"onError ${p0?.message}")
}
})
```
### Converting Push Notification Payloads to Message Objects
CometChat provides a method `CometChatHelper.processMessage()` to convert the message JSON to the corresponding object of `TextMessage`, `MediaMessage`, `CustomMessage`, `Action` or `Call`.
This code needs to be added to the `onMessageReceived()` method of the `FirebaseMessagingService` class.
```java theme={null}
CometChatHelper.processMessage(new JSONObject(remoteMessage.getData().get("message"));
```
Type of Attachment can be of the following the type\
`CometChatConstants.MESSAGE_TYPE_IMAGE`\
`CometChatConstants.MESSAGE_TYPE_VIDEO`\
`CometChatConstants.MESSAGE_TYPE_AUDIO`\
`CometChatConstants.MESSAGE_TYPE_FILE`
Push Notification Payload sample for text and media messages-
```json theme={null}
{
"alert": "Nancy Grace: Text Message",
"sound": "default",
"title": "CometChat",
"message": {
"receiver": "cometchat-uid-4",
"data": {
"entities": {
"receiver": {
"entityType": "user",
"entity": {
"uid": "cometchat-uid-4",
"role": "default",
"name": "Susan Marie",
"avatar": "https://assets.cometchat.io/sampleapp/v2/users/cometchat-uid-4.webp",
"status": "offline"
}
},
"sender": {
"entityType": "user",
"entity": {
"uid": "cometchat-uid-3",
"role": "default",
"name": "Nancy Grace",
"avatar": "https://assets.cometchat.io/sampleapp/v2/users/cometchat-uid-3.webp",
"status": "offline"
}
}
},
"text": "Text Message"
},
"sender": "cometchat-uid-3",
"receiverType": "user",
"id": "142",
"sentAt": 1555668711,
"category": "message",
"type": "text"
}
}
```
```json theme={null}
{
"alert": "Nancy Grace: has sent an image",
"sound": "default",
"title": "CometChat",
"message": {
"receiver": "cometchat-uid-4",
"data": {
"attachments": [
{
"extension": "png",
"size": 14327,
"name": "extension_leftpanel.png",
"mimeType": "image_png",
"url": "https://s3-eu-west-1.amazonaws.com/data.cometchat.com/1255466c41bd7f/media/1555671238_956450103_extension_leftpanel.png"
}
],
"entities": {
"receiver": {
"entityType": "user",
"entity": {
"uid": "cometchat-uid-4",
"role": "default",
"name": "Susan Marie",
"avatar": "https://assets.cometchat.io/sampleapp/v2/users/cometchat-uid-4.webp",
"status": "offline"
}
},
"sender": {
"entityType": "user",
"entity": {
"uid": "cometchat-uid-3",
"role": "default",
"name": "Nancy Grace",
"avatar": "https://assets.cometchat.io/sampleapp/v2/users/cometchat-uid-3.webp",
"status": "offline"
}
}
},
"url": "https://s3-eu-west-1.amazonaws.com/data.cometchat.com/1255466c41bd7f/media/1555671238_956450103_extension_leftpanel.png"
},
"sender": "cometchat-uid-3",
"receiverType": "user",
"id": "145",
"sentAt": 1555671238,
"category": "message",
"type": "image"
}
}
```
### Handle Push Notification Actions.
 **Step 1. Process push notification payload and grab BaseMessage object**
To open a chat view, firstly you will need a BaseMessage object. You can grab this from the push notification payload received in `onMessageReceived(RemoteMessage message)`. You need to call `CometChat.processMessage()` method to process push notification payload.
```java theme={null}
@Override
public void onMessageReceived(RemoteMessage remoteMessage) {
try {
JSONObject messageData = new JSONObject(remoteMessage.getData().get("message"));
BaseMessage baseMessage = CometChatHelper.processMessage(messageData);
//Process BaseMessage and show Notification
} catch (JSONException e) {
e.printStackTrace();
}
}
```
**Step 2 . Handle Notification Actions**
You can launch the chat view after you tap on the Message Notification by creating PendingIntent and set it with NotificationBuilder object.
CometChatMessageListActivity is part of UI Kit Library. You can replace CometChatMessageListActivity with your required class.
**Step 1. Process push notification payload and grab BaseMessage object**
To open a chat view, firstly you will need a BaseMessage object. You can grab this from the push notification payload received in `onMessageReceived(RemoteMessage message)`. You need to call `CometChat.processMessage()` method to process push notification payload.
```java theme={null}
@Override
public void onMessageReceived(RemoteMessage remoteMessage) {
try {
JSONObject messageData = new JSONObject(remoteMessage.getData().get("message"));
BaseMessage baseMessage = CometChatHelper.processMessage(messageData);
//Process BaseMessage and show Notification
} catch (JSONException e) {
e.printStackTrace();
}
}
```
**Step 2 . Handle Notification Actions**
You can launch the chat view after you tap on the Message Notification by creating PendingIntent and set it with NotificationBuilder object.
CometChatMessageListActivity is part of UI Kit Library. You can replace CometChatMessageListActivity with your required class.